1. SirVer/ultisnips, honza/vim-snippets
snippet(스니펫)은 재사용 가능한 소스 코드, 기계어, 텍스트의 작은 부분을 일컫는 프로그래밍 용어이다. 쉽게 말해 코드 자동완성 기능으로 재사용한 코드 혹은 텍스트의 일부분만으로 코드 및 텍스트를 자동완성하기 때문에 빠르고 오타없이 코드를 완성 할 수 있다.
ultisnips는 스니펫 엔진을 갖고 있으며 python에서 빠르고 작동 되며 기능이 가장 많습니다.
vim-snippets는 if, for, while 또는 switch case문과 같은 패턴이 정해져 있는 코드들을 사용자가 등록한 키에 의해 코드가 자동 완성되도록 ~/.vim/bundle/vim-snippets/snippets/c.snippets 해당 내용들이 적혀있습니다.
사용자는 ~/.vim/bundle/vim-snippets/snippets/ 폴더내 파일들을 수정하여 자신만의 snippet을 만들어 사용 할 수 있습니다.
2. .vimrc에 Plugin 추가
call vundle#begin()
" let Vundle manage Vundle
" required!
Plugin 'VundleVim/Vundle.vim'
"명령어 자동완성 플러그인(inc + <C-a> : #includ<>)
Plugin 'SirVer/ultisnips'
Plugin 'honza/vim-snippets'
call vundle#end()
vim Plugin 사용방법
3. 설정
" Trigger configuration. You need to change this to something other than <tab> if you use one of the following:
" - https://github.com/Valloric/YouCompleteMe
" - https://github.com/nvim-lua/completion-nvim
let g:UltiSnipsExpandTrigger="<C-a>"
let g:UltiSnipsJumpForwardTrigger="<tab>"
let g:UltiSnipsJumpBackwardTrigger="<s-tab>"
" If you want :UltiSnipsEdit to split your window.
let g:UltiSnipsEditSplit="vertical"
" let g:UltiSnipsSnippetDirectories = ['~/.vim/UltiSnips']| 명령어 | 동작 설명 |
| let g:UltiSnipsExpandTrigger="<C-a>" | 키워드를 입력하고 Ctrl 키를 누른상태에서 a 키를 누르면 키워드에 매칭 되는 코드가 완성된다. |
| let g:UltiSnipsJumpForwardTrigger="<tab>" | 완성된 코드에 커서가 배경이 highlight 된 부분으로 자동 이동되는데 tab을 이용하여 다음 highlight된 부분으로 이동 할 수 있다. |
| let g:UltiSnipsJumpBackwardTrigger="<s-tab>" | tab으로 자동 이동 후 shift를 누른 상태에서 tab을 이용하여 이전 highlight된 부분으로 이동 할 수 있다. |
| let g:UltiSnipsEditSplit="vertical" | 코딩중에 snippet 파일을 수정할 일이 생겼을 경우 노멀 모드에서 :UltiSnipsEdit 명령어로 내가 사용하고 있는 snippet 파일을 열 수 있다. 이때 화면을 좌우로 분할하여 사용한다는 뜻이다. |
| " let g:UltiSnipsSnippetDirectories = ['~/.vim/UltiSnips'] | snippet 파일을 사용자가 지정 할 수 있는데 그 경로를 가르킨다. |
주의사항
현재의 자동완성 기능은 snippet에 정의된 내용만이 작성이 됩니다.
snippet에 정의되지 않은 키워드는 자동완성되지 않으며 vim에서 지원하는 ctrl+p를 이용한 자동 완성과는 다릅니다.
추후 작성중인 코드내 변수 또는 해당 프로젝트에서 사용하는 변수들의 자동완성 기능 플러그인들인 coc.nvim, copilot.vim, youcompleteme 등을 포스팅 하도록 하겠으며 해당 트리거 키를 하나로 통일 하는 설정도 포스팅 하겠습니다.
자동완성 키워드를 더 알고 싶거나 추가하고 싶으면 아래 파일을 참고하거나 수정하시면 됩니다.
~/.vim/bundle/vim-snippets/snippets/c.snippets
ultisnips git hub 주소
4. 현재까지의 설정이 적용된 .vimrc 내용
"-----------------------------------------------------------------------"
" Vundle 환경설정
"------------------------------------------------------------------------"
filetype off                   " required!
set shell=/bin/bash
set rtp+=~/.vim/bundle/Vundle.vim
call vundle#begin()
        " let Vundle manage Vundle
        " required!
        Plugin 'VundleVim/Vundle.vim'

        " vim 하단에 파일 정보 띄우기
        Plugin 'vim-airline/vim-airline'
        Plugin 'vim-airline/vim-airline-themes'

        "vim corlor/scheme 수정
        Plugin 'morhetz/gruvbox'

        " 파일 및 폴더 탐색
        Plugin 'ctrlpvim/ctrlp.vim'

        " vim 사용중 git 명령어 사용
        Plugin 'tpope/vim-fugitive'

        "vim 하단에 커서가 있는 함수나 변수의 정의 부분을 출력
        Plugin 'wesleyche/srcexpl'

        "명령어 자동완성 플러그인(inc + <C-a> : #include<>)
        Plugin 'SirVer/ultisnips'
        Plugin 'honza/vim-snippets'

    " ...
call vundle#end()
filetype plugin indent on     " required!
        "
        " Brief help
        " :BundleList          - list configured bundles
        " :BundleInstall(!)    - install(update) bundles
        " :BundleSearch(!) foo - search(or refresh cache first) for foo
        " :BundleClean(!)      - confirm(or auto-approve) removal of unused bundles
        "
        " see :h vundle for more details or wiki for FAQ
        " NOTE: comments after Bundle command are not allowed..

"-----------------------------------------------------------------------"
"vim 환경설정
"-----------------------------------------------------------------------"

        " Vim 전용 기능 사용
        set nocompatible "Vim Using

        "파일 타입 설정
        set encoding=utf-8
        set fencs=utf-8,cp949,cp932,euc-jp,shift-jis,big5,ucs-2le,latin1

        " 명령어 기록 갯수
        set hi=1000

        " 백스페이스 사용
        set bs=indent,eol,start

        " 오른쪽 하단 커서 위치 항상 보이기
        set ru "same ruler

        " 줄번호 표시
        set nu

        " 줄 번호 표시 너비 설정
        set nuw=5

        " 탭 크기 설정
        set ts=4 "same tabstop
        set sw=4 "same shiftwidth
        set sts=0 "same softtabstop

        autocmd FileType make setlocal noexpandtab "Makefile은 tab 문법이기 때문에 스페이스 대체 안함.
        " 탭 >> 공백 변환 사용안함
        "set noet

        " 자동 줄바꿈 안함
        "set nowrap
        set linebreak
        set showbreak=+++\

        " 들여쓰기 설정
        set autoindent
        set cindent

        " 스마트 셋팅
        set smartcase
        set smarttab
        set smartindent

        " magic 기능 사용
        set magic

        " 이동 동작시 줄의 시작으로 자동 이동
        set sol

        " 비쥬얼 모드 동작 설정
        set sel=exclusive

        " 괄호짝 찾기에서 <> 도 찾도록 추가
        set mps+=<:>

        " 검색어 강조
        set hls

        " 검색시 파일 끝에서 되돌리기 안함
        set nows

        " 스마트한 대소문자 구별 기능 사용
        set scs

        "대소문자 구분(구분 없이 할 때 i 옵션 또는 ignorecase)
        set noignorecase

        " 항상 status 라인을 표시
        set ls=2

        "파일 형식에 따른 신택스 하이라이팅 켜기
        sy enable

        "괄호 매치
        set showmatch

        "마우스 자동
        set mouse=a

        "클립보드 복사
        "set clipboard=unnamed "use OS clipboard
        set clipboard=unnamedplus "use OS clipboard

        " 키워드 입력시 점진적 검색
        set incsearch
        set spell
"----------------------------------------------------------------------"
" AirLine
"----------------------------------------------------------------------"
set laststatus=2
let g:airline#extensions#tabline#enabled = 1 "버퍼 목록 켜기
let g:airline#extensions#tabline#left_sep = ' '
let g:airline#extensions#tabline#left_alt_sep = '|'
" 파일명만 출력
let g:airline#extensions#tabline#fnamemod = ':t'
let g:airline_highlighting_cache = 1

let g:airline_powerline_fonts = 1
let g:airline_theme= 'minimalist'
"let g:airline_section_y = ''
"let g:airline_section_warning= '' "마지막 status창 사용 안함
" 버퍼 목록 켜기
" 이 옵션은 버퍼를 수정한 직후 버퍼를 감춰지도록 한다.
" 이 방법으로 버퍼를 사용하려면 거의 필수다.
set hidden


"----------------------------------------------------------------------"
" gruvbox 설정
"----------------------------------------------------------------------"
set background=dark
let g:gruvbox_contrast_dark = 'soft'
"let g:gruvbox_contrast_light = 'soft'
"let g:gruvbox_transparent_bg = '1'
let g:gruvbox_italic = 1
"let g:gruvbox_underline=1
"let g:gruvbox_undercurl=1
"let g:gruvbox_termcolors=16
"let g:gruvbox_number_column='aqua'
"let g:gruvbox_sign_column='aqua'
"let g:gruvbox_color_column='aqua'

" Force to use underline for spell check results
augroup SpellUnderline
  autocmd!
  autocmd ColorScheme *
    \ highlight SpellBad
    \   cterm=Underline
    \   ctermfg=NONE
    \   ctermbg=NONE
    \   term=Reverse
    \   gui=Undercurl
    \   guisp=Red
  autocmd ColorScheme *
    \ highlight SpellCap
    \   cterm=Underline
    \   ctermfg=NONE
    \   ctermbg=NONE
    \   term=Reverse
    \   gui=Undercurl
    \   guisp=Red
  autocmd ColorScheme *
    \ highlight SpellLocal
    \   cterm=Underline
    \   ctermfg=NONE
    \   ctermbg=NONE
    \   term=Reverse
    \   gui=Undercurl
    \   guisp=Red
  autocmd ColorScheme *
    \ highlight SpellRare
    \   cterm=Underline
    \   ctermfg=NONE
    \   ctermbg=NONE
    \   term=Reverse
    \   gui=Undercurl
    \   guisp=Red
  augroup END
set termguicolors
colorscheme gruvbox


"----------------------------------------------------------------------"
" ctrlp.vim 설정(파일 탐색 속도 향상)
"----------------------------------------------------------------------"
set wildignore+=*/tmp/*,*.so,*.a,*.swp,*.zip,*.obj  " MacOSX/Linux
set wildignore+=*\\tmp\\*,*.swp,*.zip,*.exe             " Windows

let g:ctrlp_custom_ignore = '\v[\/]\.(git|hg|svn)$'
let g:ctrlp_custom_ignore = {
  \ 'dir':  '\.git$\|public$\|log$\|tmp$\|vendor$',
  \ 'file': '\v\.(exe|so|dll|a)$',
  \ 'link': 'some_bad_symbolic_links'
\ }
let g:ctrlp_max_files = 10000
let g:ctrlp_max_depth = 30
let g:ctrlp_follow_symlinks = 1
"let g:ctrlp_user_command = ['.git', 'cd %s && git ls-files -co --exclude-standard']
"let g:ctrlp_use_readdir = 0
let g:ctrlp_root_markers = ['ctrlp-marker']

" <c-f>, <c-b> 모드 변환(MRU(Most Recently Used)내 검색, file 전체 검색, buffers내 검색)
" <c-d> path내 검색어가 포함되어 검색 또는 오직 파일내 검색어만 포함 검색
" <c-r> 정규 표현식 모드 전환(검색어와 완전히 일치한 파일만 보여 줌)
" <c-j>, <c-k> 검색결과내 커서 위아래 이동
" <c-t>, <c-v>, <c-x> 파일을 새로운 tab으로 열거나 창을 분활하여 파일을 염.
" <c-n>, <n-p> 검색 history의 next/previous 문자열 선택
" <c-z>, <c-o> 검색된 결과물에 <c-z>로 마크를 하고 <c-o>로 오픈(멀티마크 가능)
" <c-y> 검색입력어로 된 파일을 만든다. 파일 위치는 검색 폴더의 최상위 위치
" :help ctrlp-mappings 키 맵핑에 관한 설명


"-----------------------------------------------------------------------"
" Source Explorer 환경설정
"-----------------------------------------------------------------------"
nmap <F8> :SrcExplToggle<CR>            " F8 key = SrcExpl TOggle

let g:SrcExpl_winHeight = 12            " SrcExpl 윈도우 높이 지정
let g:SrcExpl_refreshTime = 100         " refreshing time = 100ms
let g:SrcExpl_jumpKey = "<ENTER>"       " 해당 definition으로 jump
let g:SrcExpl_gobackKey = "<SPACE>"     " back
let g:SrcExpl_pluginList = [
        \ "__Tag_List__",
        \ "_NERD_tree_",
        \ "Source_Explorer"
        \ ]

" // The color schemes used by Source Explorer. There are five color schemes
" // supported for now - Red, Cyan, Green, Yellow and Magenta. Source Explorer
" // will pick up one of them randomly when initialization.
let g:SrcExpl_colorSchemeList = [
        \ "Cyan",
    \ ]

" // Enable/Disable the local definition searching, and note that this is not
" // guaranteed to work, the Source Explorer doesn't check the syntax for now.
" // It only searches for a match with the keyword according to command 'gd'
let g:SrcExpl_searchLocalDef = 1

" // Workaround for Vim bug @https://goo.gl/TLPK4K as any plugins using autocmd for
" // BufReadPre might have conflicts with Source Explorer. e.g. YCM, Syntastic etc.
let g:SrcExpl_nestedAutoCmd = 1

" // Do not let the Source Explorer update the tags file when opening
let g:SrcExpl_isUpdateTags = 0

" // Use 'Exuberant Ctags' with '--sort=foldcase -R .' or '-L cscope.files' to
" // create/update the tags file
let g:SrcExpl_updateTagsCmd = "ctags --sort=foldcase -R ."

" // Set "<F12>" key for updating the tags file artificially
let g:SrcExpl_updateTagsKey = "<F12>"

" // Set "<F3>" key for displaying the previous definition in the jump list
let g:SrcExpl_prevDefKey = "<S-K>"

" // Set "<F4>" key for displaying the next definition in the jump list
let g:SrcExpl_nextDefKey = "<S-J>"


"-----------------------------------------------------------------------"
" ultisnips&vim-snippets Trigger Configuration
"-----------------------------------------------------------------------""
" Trigger configuration. You need to change this to something other than <tab>
" if you use one of the following:
" " - https://github.com/Valloric/YouCompleteMe
" " - https://github.com/nvim-lua/completion-nvim
let g:UltiSnipsExpandTrigger="<C-a>"
let g:UltiSnipsJumpForwardTrigger="<tab>"
let g:UltiSnipsJumpBackwardTrigger="<s-tab>"
" If you want :UltiSnipsEdit to split your window.
let g:UltiSnipsEditSplit="vertical"
" let g:UltiSnipsSnippetDirectories = ['~/.vim/UltiSnips']
5. 현재까지의 설정이 적용된 vim 코드 뷰

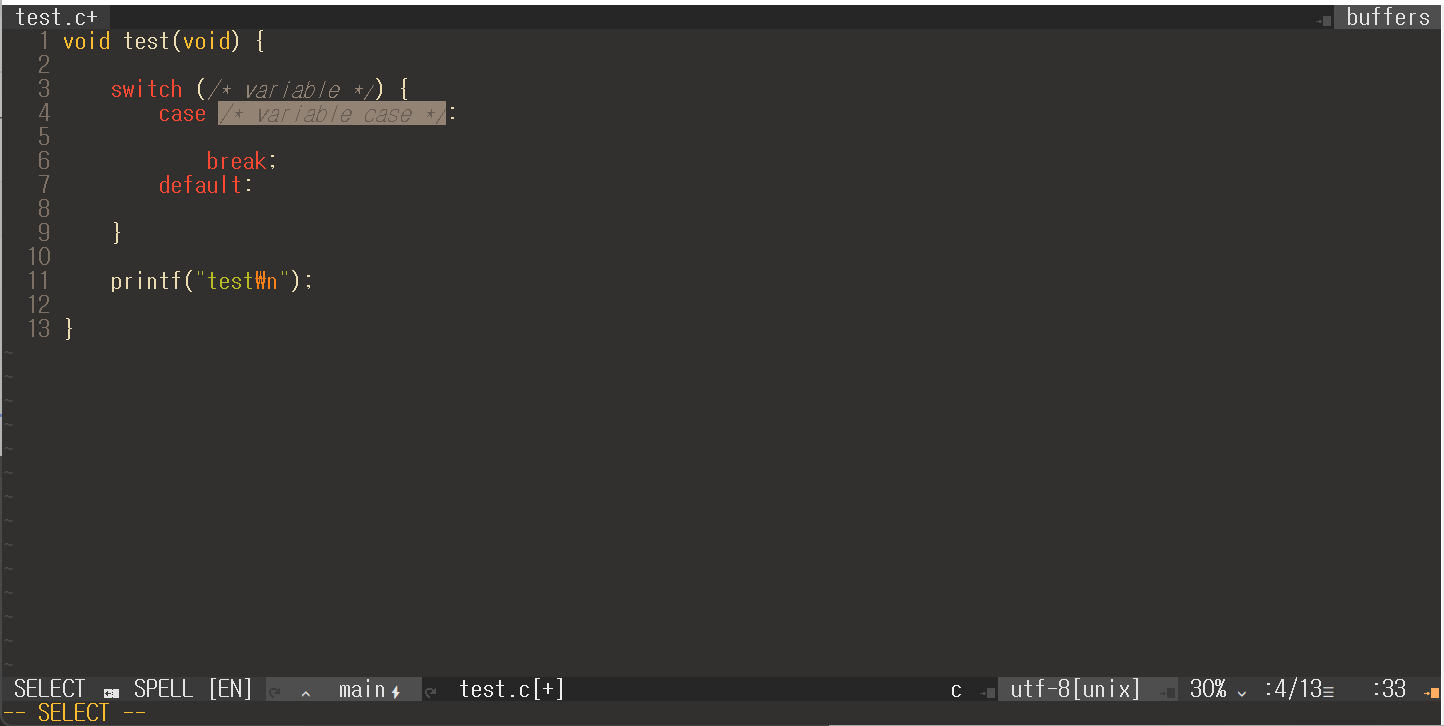
highlight된 상태에서 키보드로 변수 입력이 가능하며 입력 후에도 <tab> 또는 <s-tab>을 이용하여 이동이 가능합니다.
'Linux > VIM' 카테고리의 다른 글
| vim 파일 탐색 플러그인 fzf (0) | 2023.04.04 |
|---|---|
| vim 괄호 자동으로 닫아주는 플러그인 (0) | 2023.03.19 |
| wesleyche/srcexpl 설치 및 사용 방법 (0) | 2022.07.10 |
| VIM Plugin tpope/vim-fugitive 설치 및 사용 방법 (0) | 2022.05.11 |
| VIM Plugin ctrlp.vim 설치 및 사용 방법 (0) | 2022.05.10 |


댓글